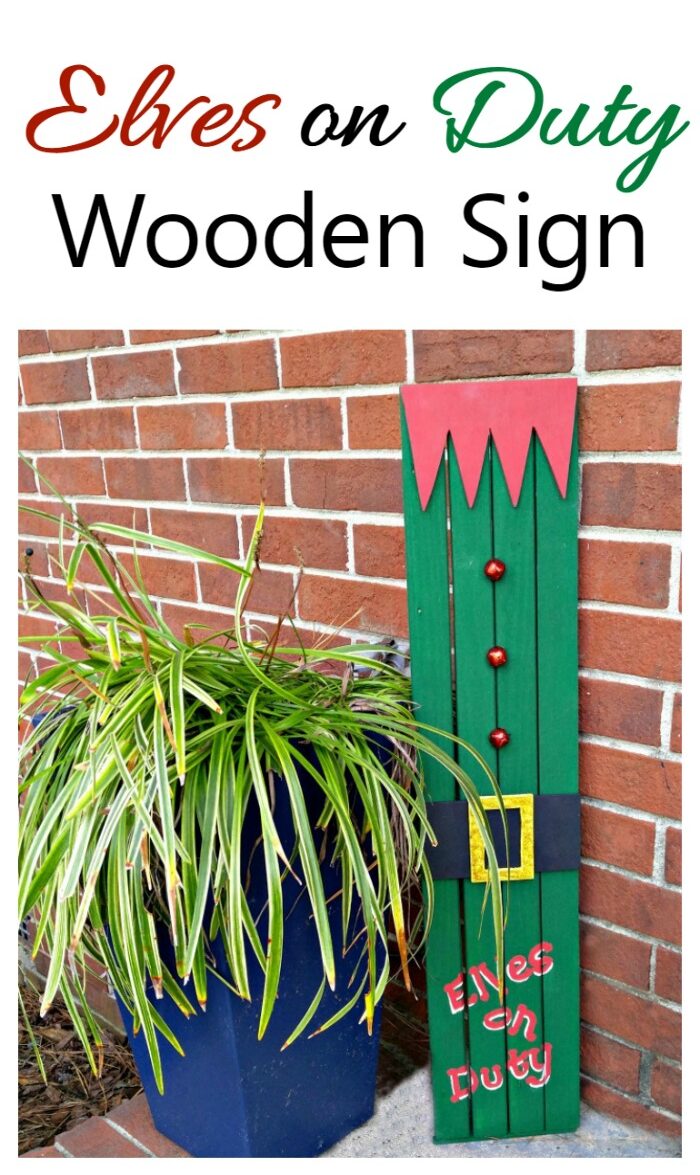
This reclaimed wooden elf doorway sign adds a touch of whimsical holiday glee to my front door entry.
The project is super easy to do and the kids will be overjoyed each time they walk though the door, thinking of Christmas.
Is Christmas decorating your thing? Check out my recent post featuring the Incredible Christmas Place.
My grandmother used to say “waste not, want not” to me all the time. She instilled in me a really frugal nature that comes out at the oddest times.
Who would think that a pile of lumber from an old door frame would end up in such a cute way?
The other two projects, Santa Claus Wall Hanging and a sad snowman shutter hanging are happy to have my Elves on Duty Wooden doorway sign join them!
Speaking of Santa, if you have kids hoping to be on Santa’s nice list, make sure to check out our posts with Santa’s address and the official Santa phone number, so he will get their wishlist in time.
This design adds a rustic touch of curb appeal to the front of your house.
Note: Power tools, electricity, and other items used for this project can be dangerous unless used properly and with adequate precautions, including safety protection. Please use extreme caution when using power tools and electricity. Always wear protective equipment, and learn to use your tools before you start any project.
Let’s make this wooden elf doorway sign
This post may contain affiliate links. I earn a small commission, at no extra cost to you if you purchase through an affiliate link.
To make the project, you will need the following supplies:
- Four pieces of wood – 30″ x 1 1/2″ x 5/8″
- 1 piece of plywood – 12″ x 8″ x 1/4″
- 3 red jingle bells 3/4″
- Acrylic craft paint – red, yellow, white, green
- Gold glitter glue
- Paintbrushes
- Saw
- Jigsaw
- Nails
- Sand paper
- Pattern for overlays which you can print out here
- Hot glue gun and glue sticks
We started the wooden elf doorway sign project by cutting our long wooden pieces and sanded them on the top and bottom. 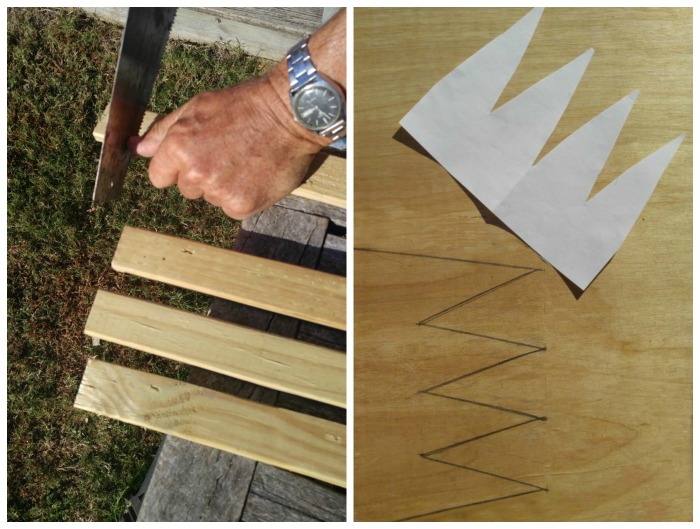
Next, my husband used a jigsaw to cut the overlay patterns for the collar, belt, buckle and wooden base.
Once all the overlays were cut out, we sanded them to make them smooth.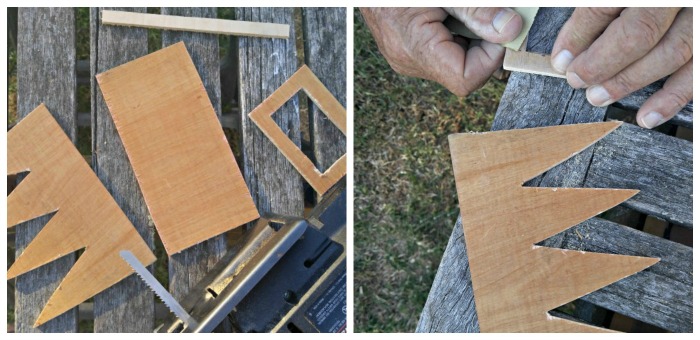
Now comes the fun part! I love to see the project come together. I painted the wooden boards green, the collar red, the belt black and the buckle yellow. 
Using a large nail, I spaced my long boards so that there was a small opening between them.
Then, I hot glued the collar and black belt to the top and middle of the boards to secure them in place.
Three red jingle bells were glued in place for the elf buttons.
A small piece of green plywood was added to the very bottom of the wooden sign to give it a base and finish holding the long boards in place.
I hot glued the yellow belt buckle to the middle of the belt and added a good helping of gold glitter glue to give it some sparkle.
I painted my wording on the bottom of the wooden elf doorway sign by using a pencil first and then painting over the words with red and white acrylic paint.
I wanted a drop shadow effect, so I painted the words white first, allowed them to dry and then added the red lettering over the top slightly on an offset so that the white paint would just show on the edges. 
You can print out this pattern for your painting.
Display with pride at your front door entry. I just leaned my sign against the brickwork for a casual look.
I put it next to a planter I had on the front porch, but if you want to go above and beyond, you could put it next to a poinsettia plant. They would be festive all month long because poinsettias are a symbol of Christmas and National Poinsettia Day even falls in December!
If you would like to hang your sign, just attach a saw tooth metal picture hanger to the top of the back side.
Have you ever used old wood to make into new craft projects? What did you do with your wood? I’d love to hear about your project (and see some photos) in the comments below!)
For more cute holiday projects, be sure to visit my It’s Christmas Time board on Pinterest.
If you enjoyed this project, be sure to check out my magic reindeer food bags. It’s a fun project that will bring the magic of Christmas to your children.