This Santa Claus wall hanging is fun to make and would look great on your wall or entry.
The reclaimed wood Santa decoration makes use of some left over wood from a recent renovation project.
If you have kids who love Santa hoping to be on Santa’s nice list, make sure you check out our posts with Santa’s address, and the official Santa phone number so your kids can get their Christmas wishlist to him!
Recycling old items into new holiday decor is one of the fun parts of the holidays for me. It’s also an environmentally-conscious way to celebrate the season.
See my alphabet block Christmas tree for another fun example of turning old items into new treasures.

In fact, turning old stuff into new projects is one of my suggestions for celebrating National Old Stuff Day.
Do you love Christmas decorating as much as I do? Check out my recent post featuring the Incredible Christmas Place.
My husband and I have been doing over our kitchen pantry, so I have a lot of left over wood. One of my favorite craft projects to do is re-purpose items that would end up in the trash. This DIY Santa Claus wall hanging is super cute and can be used on a wall, or just leaning against a wall at your doorway.
The project started out as a pile of wood that came from the door frame of my old pantry. Then, I made a trip to the Dollar store recently to stock up with some inexpensive craft supplies for the holidays so I had pretty much everything on hand that I needed to make the project. 
This project adds a rustic touch of curb appeal to your front entry.
Note: Power tools, electricity, and other items used for this project can be dangerous unless used properly and with adequate precautions, including safety protection. Please use extreme caution when using power tools and electricity. Always wear protective equipment, and learn to use your tools before you start any project.
Let’s get going on the Santa Claus wall hanging
To make the reclaimed wood Santa decoration you will need the following supplies.
- Four pieces of wood sized: 2″ x 24″
- 1/2″ plywood. You will need about 2 feet
- Hammer, saw and nails
- Acrylic craft paint in white, red, brown, yellow and green colors
- 6 – 1/2″ gold jingle bells
- 1 – 3/4″ red jingle bell
- Gold glitter glue
- Yellow plastic rope (I bought mine at Lowe’s and could get it by the yard. I needed 1 yard.)
- Glue gun and hot glue sticks – take care, hot glue can burn
- Plastic holly and berries
- Skill saw
- Paintbrushes
- Black felt sized 12″ x 2″
We started the project by laying the boards out, spaced with a nail to get the width and then measuring and cutting the plywood for the braces.
We ended up with 2 braces, each made of two pieces of plywood sized 7 1/2″ x 1 3/4″ We doubled the braces so that the nails would not show through on the front when nailed to the boards.

Once the braces were cut, we spaced them by using a large nail and then nailed them to the back of the boards.
An additional piece of small plywood and a picture hanger were attached to the back, as well.
Next, I traced out the head and body of the Santa Claus around the edges of the top and sides of the boards. I left the bottom boards straight.
I did this free hand from my shape pattern, but you can use graph paper to enlarge it if you need to.
My husband cut the shape on my attached boards with a jigsaw.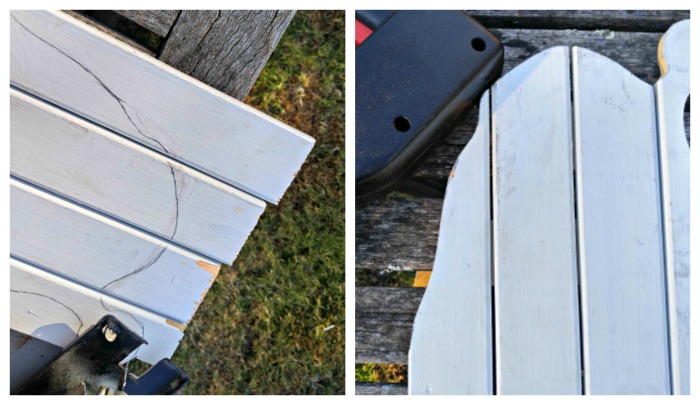
You can print it the pattern out here.
Once the boards were cut out to the desired shape, I got to work painting. The boards were white, but I gave them another coat around the beard area and on the pompom.
Then I painted in the face area using red paint, white and yellow paint to make a flesh tone. Now the reclaimed wood Santa decoration needs some dimension. I did this by cutting out some plywood overlays in a tree, hat brim and mustache shape with a skill saw.
Then the shapes were sanded and painted.

Add the hat brim and mustache to your Santa head area. Paint some eyes on the Santa face and add the red jingle bell for a nose.
Attach the holly and berry to the hat brim. I used a plastic coated yellow rope. I tried various types of rope and this one was the easiest to “seal” on the ends with a bit of hot glue.
I formed the word joy and added it to the bottom of the Santa figure with my hot glue gun.
The belt and buckle are made of a piece of black felt and a piece of plywood sized 2 1/2″ x 1 1/2″ with a hole cut out of the center.
I wrapped the black felt around the waist of the Santa and then painted the plywood yellow and hot glued it to the belt.
Then I used gold glitter paint to add some shine to the belt buckle.
The final step in making this Santa Claus wall hanging is to add six gold jingle bells to the tree and attach it to the stomach of the Santa figure.

Displaying the reclaimed wood Santa decoration
That is all there is to this Santa Claus wall hanging decoration. Here comes Santa Claus, here comes Santa Claus!!
The kids will just LOVE this decoration! It looks great on an interior wall, and also could be used on your front entryway.
You could display it between next to a poinsettia plant! Santa and poinsettias always make me think about Christmas, and December in general, because National Poinsettia Day also falls in December.

Have you ever used recycled items for a Christmas decoration? What did you make out of it? Tell us in the comments below!
Joanna Hanna
Thursday 21st of October 2021
Love This DIY Thank You
Carol
Tuesday 6th of December 2016
Thanks Martin. It was so much fun to make. Carol
Martin Williams
Monday 5th of December 2016
Creative & Superb DIY project for this Christmas. I LOVED your creativity. I will try it :)
Linda
Thursday 1st of December 2016
This is adorable!
Carol
Thursday 1st of December 2016
Thanks Linda. This is the third one I made from the old kitchen door frame. Carol