If you love inexpensive craft ideas for fall, this DIY tree centerpiece is for you. It’s easy to make and will look great as a part of any Thanksgiving tablescape.
I love the colors of fall. Everything is changing and the trees take on a wonderful palette of colors that is perfect for decorating. This DIY fall decor project makes use of those vibrant leaf colors.
Keep reading to learn how to make this DIY fall tree centerpiece.

Supplies for this fall tree decoration
You will need the supplies below for this decorated fall tree:

Some of the links below are affiliate links. I earn a small commission, at no extra cost to you if you purchase through an affiliate link.
- 2 foam cones of varying sizes. The large one is 18″ tall and the small one is 7″ tall.
- 250 silk leaves (or leaves from your yard)
- Hot glue gun and glue sticks
- Basket for the tall tree
- Terracotta saucer for the small tree
- Sphagnum moss
- Green moss
- Plastic packing peanuts
Note: Hot glue guns, and heated glue can burn. Please use extreme caution when using a hot glue gun. Learn to use your tool properly before you start any project.
DIY tree centerpiece instructions
You can either make this inexpensive fall leaf tree with leaves from your yard or by using silk leaves like I did. Either way, it ends up as a fun leaf tower that really screams “autumn is here.”

The two foam cones are give the shape that you need for the trees. All you need to do is cover them with leaves!
I ended up using 5 packages of leaves for this project that I got at the Dollar Store. The packages had a nice variety of leaf sizes and colors which made them perfect for my project!
To attach the leaves, add a small dot of glue on the back center at the bottom of each leaf. This will allow them to stick quickly and will still let them move at the top to give a nice finished look.
TIP: The glue will be hot to touch. Use an old pencil with the eraser almost gone to hold the glue till it sticks to keep from burning your fingers.
Start at the top and attach leaves around in a circle to cover the foam area. The top will show but you’ll be adding a few cut pieces at the end to cover it.
Continue adding leaves in a circular motion as you move down the tree.
I alternated colors and also alternated sizes of leaves for the rows to give a more natural palette of colors to the tree.
Keep adding leaves as you move down the cone. Think of the project as a puzzle, where you place leaves next to each other to fill in gaps to cover the foam.
On the large tree, I used small leaves at the top and larger leaves as I got closer to the bottom. On the small tree, I used mainly smaller leaves and cut the larger leaves into pieces to fill in gaps and add variety to the color.
I also made sure to tilt the leaves as I worked, which made them fit better.

When you get to the bottom edge, alternate large and small leaves and have the bottom leaves line up to the edge. Finish the tree by cutting a few leaves and gluing them to the top to cover the top of the cone.
Tada!

Making a base for these tree centerpiece ideas
The next step is to give the trees something to sit in. I had a green harvest basket that I used in a previous project. It was the right size for my tall tree and matched the green leaves nicely.
I filled the basket with packing peanuts to raise the height, so more of the tree will be visible.

Since I also love to garden, I used an extra terracotta saucer I had lying around for the smaller tree.
To give these trees a polished appearance, I added green moss to the saucer and brown sphagnum moss to the basket for the trees to sit on.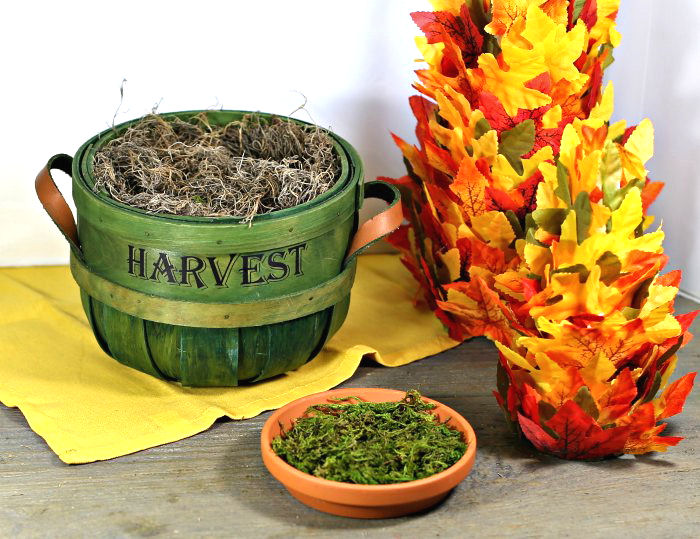
Displaying these decorated fall trees
The trees are now ready for my Thanksgiving tablescape. To display them, I displayed them prominently beside a small Dollar Store sign with the word “gather” on it.
I also used a hurricane lamp project that I made last year with coordinating colors in this display.
Adding these to the DIY leaf trees gave me a harvest themed centerpiece decoration
And don’t stop there! There are so many ways to incorporate these leaf trees into your fall table decor.
Add a bowl of this Thanksgiving snack mix and frame the free blessings printable that comes with the recipe, to sit near this festive tree.
For this fall vignette, I added another candle, some pine cones, a galvanized water jug with Japanese silver grass plumes from my yard and a basket of mini pumpkins and gourds.
The table is all set for Thanksgiving! You could even add some fun Turkey name card holders when you set the table for guests.

Share this fall tree decor on X
Have you enjoyed learning DIY fall tree centerpiece? Let your friends and family know about it by sharing this post:
The leaves are falling and the cool temperatures are here. Head on over to Always The Holiday to find out how to make a tree tower to use as a centerpiece for Thanksgiving. #Thanksgiving #autumn #fallingleaves 🌲🍁🌳🍁 Share on XPin this DIY tree centerpiece for later
Would you like a reminder of this fall table decor idea? Just pin this image to one of your holiday boards on Pinterest so that you can easily find it later.
This project took me about 2 hours and cost $12. Your mileage will vary depending on where you get your supplies. The only thing I had to buy were the two cones (one from the Dollar store) and the leaves.
Everything else I had on hand from other projects, which is a type of crafting that I love. I enjoy finding new ways to use old craft supplies to keep the cost of crafting down.
Admin note: This post first appeared on the blog in November of 2019. I have updated the post to add new photos, a printable project card and a video for you to enjoy,
Thanksgiving Table Centerpiece - Fall Tree Tower
This easy fall centerpiece is made from a foam cone and silk flowers to form a tree tower. It looks great as part of a Thanksgiving tablescape.
Materials
- 2 foam cones of varying sizes. 8" tall and 7" tall.
- 250 silk leaves (or leaves from your yard)
- Basket for the tall tree
- 3 inch terracotta saucer for the small tree
- Sphagnum moss
- Green moss
- Plastic packing peanuts
Tools
- Hot glue gun
- Glue sticks
- Scissors
Instructions
- Starting at the top of the cones, add a drop of hot glue to the bottom center of each leaf and press into place. Use the leaves to partially cover the tip of the cone.
- Rotate the foam cone as you continue to add leaves down the tree, alternating colors and sizes of leaves to make them fit. Try not to leave any white space on the cone exposed.
- Use more of the small leaves towards the top (especially on the small cone) and more of the larger ones on the bottoms.
- Tilt the leaves as you position them to make them look more realistic.
- Finish by alternating small and large leaves and end with a flat bottom to match the edge of the cones for the last row.
- Cut some leaf pieces and glue them in the very top to cover the top of the foam cone. Also fill in any gaps with cut pieces where the white foam is showing.
- Add packing peanuts to a basket and top with sphagnum moss.
- Add green moss to a saucer.
- Put the small tree in the saucer, and the large tree in the basket.
- Display with pride.
Recommended Products
As an Amazon Associate and member of other affiliate programs, I earn from qualifying purchases.


