This sweet Mason jar snowman with cherry Santa hats would look great on a mantle or coffee table for the holidays. He is made from a recycled jar and some felt and is just adorable.
Recycling old items into new holiday decor is one of the fun parts of the holiday for me. It is an environmentally-friendly way to give new life to old objects.
See my alphabet block Christmas tree for another fun example of turning old items into new treasures.
November 30 is Mason Jar Day. This cute project would be a great way to celebrate the day as well as giving you a new Christmas decoration to display.

Note: Hot glue guns, and heated glue can burn. Please use extreme caution when using a hot glue gun. Learn to use your tool properly before you start any project.
These cute little guys will really brighten up any holiday room with their cheerful faces and Christmasy hats.
They are quick and easy to make, too.
Share this jar snowman project on Twitter
Turn ordinary jars into cute snowmen and Santa figures with this fun Christmas project. Get the tutorial on Always the Holidays. ☃🎅☃ Share on XMaking the Mason jar snowman
To make this fun project, you will need the following supplies:
- 2 empty jar of 2 sizes – Mason jars are fine but any empty jar with a smooth side will work well
- White acrylic paint
- 4 wiggle eyes
- 2 squares of red felt – approximately 5 inches square (width around your jars plus a seam allowance.)
- 12 inch piece of white fur trim
- 2 white pompoms 3/4 inch
- Hot glue
- Needle and thread
- LED lights (optional, to make it a glow light)
Start by painting your jars with the white paint. Allow to dry completely.

Once the jars are dry, use a hot glue gun to affix two wiggle eyes to each jar.
Fold the squares of felt in half to make a triangle, pin it and sew along the long open seam. Be sure the opening on the bottom matches the size of your jar top.
Turn the seam to the inside.

Use hot glue to add the white fur trim to the bottom opening. Attach the white pompom to the hat tip with hot glue.

Slip the hat over the top of the Mason jars and display with pride.
To use the jar snowmen as glow lights, place an LED battery operated light inside the jars. (affiliate link)
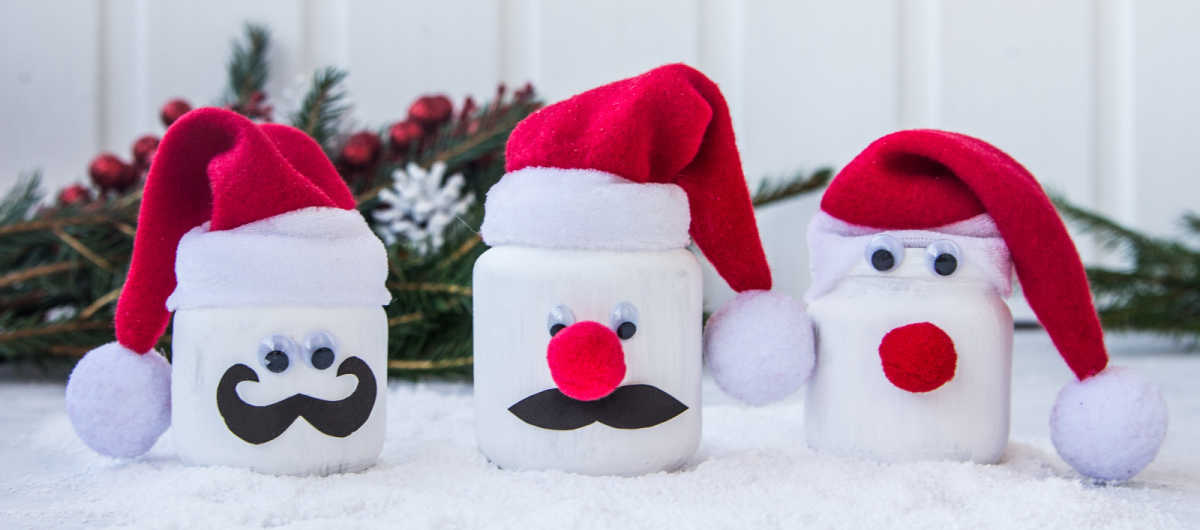
Making Santa jars
These jars can be used to make other Christmas figures with the addition of red pompom noses and black felt mustaches.
Pin this post for making jar snowmen
Would you like a reminder of this post for a mason jar snowman decoration? Just pin this image to one of your Christmas boards on Pinterest so that you can easily find it later.

Admin note: this post for Mason jar snowmen first appeared on the blog in October of 2013. I have updated the post to add all new photos, a printable project card and a video for you to enjoy.
Mason Jar Snowman

These cute jar snowmen would look adorable on a side table for the holidays. Add an LED battery operated light inside to make them glow lights.
Materials
- 2 empty jar of 2 sizes
- White acrylic paint
- 4 wiggle eyes
- 2 squares of red felt – approximately 5 inches square (width around your jars plus a seam allowance.)
- 12 inch piece of white fur trim
- 2 white pompoms 3/4 inch
- LED lights (optional, to make it a glow light)
Tools
- Needle and thread
- Hot glue
Instructions
- Paint the jars with white paint. Let dry.
- Use hot glue to attach two wiggle eyes to each jar.
- Measure your jar circumference at the top. Cut the red felt into a square this size plus a seam allowance.
- Fold the red felt to make a triangle. Pin and sew the long edge.
- Turn the seam to the inside.
- Cut a trip of white fur trip to go around the bottom opening of the hat.
- Glue it in place with hot glue.
- Glue the pompom on the hat tip.
- If using as a glow light, place an LED battery operated light inside the jar.
- Fit the hat on the jar top and display.
Recommended Products
As an Amazon Associate and member of other affiliate programs, I earn from qualifying purchases.


