This Christmas Ornament Door Hanger is made from reclaimed wood, chicken wire and some Dollar Store ornaments.
It makes a nice change from the traditional Christmas wreath.
My husband and I changed the front door to our home last year. Instead of a solid door, we now have an oval shaped glass panel in it.
I love this look, but it makes it hard to use wreaths now, so I am always looking for new ways to decorate the door and add curb appeal to the front of our house.

Adding a poinsettia plant on both sides of the doorway would tie in the red stripe in the bow. It would also celebrate National Poinsettia Day which falls in December.
I first saw a version of this door on a site from the Netherlands called Welke. The directions were in Dutch but I figured that I could work out how to make it just by looking at it.
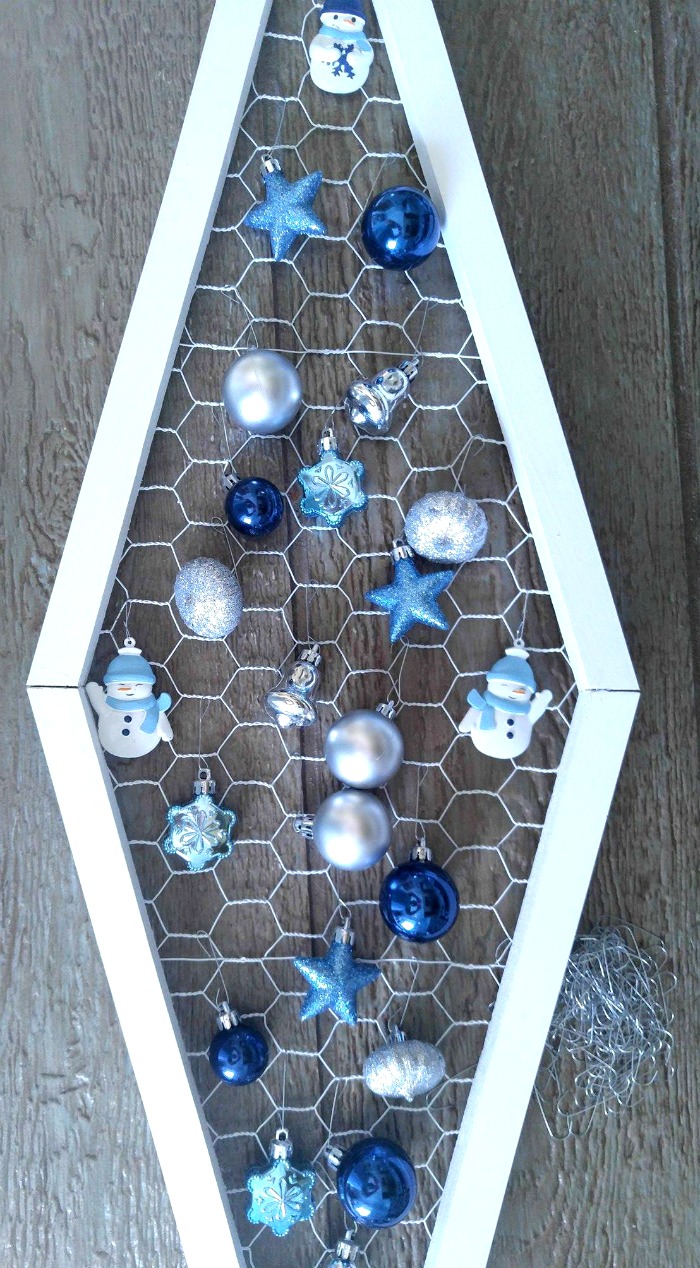
Since the panel on our door is oval, I decided that a diamond shape would work better than the triangle that I first discovered on the site.

We are also giving our kitchen a remodel, so I have lots of extra wood. My poor husband is about ready to move out, I think.
Every time he has some off cuts of wood, I say “I know what we can make with this!!” (as he rolls his eyes, knowing that we means lots of work by him.) But bless his heart, he always helps me out!
Note: Power tools, electricity, and other items used for this project can be dangerous unless used properly and with adequate precautions, including safety protection. Please use extreme caution when using power tools and electricity. Always wear protective equipment, and learn to use your tools before you start any project.
Make your own Christmas Ornament Door Hanger
I got most of the supplies for this Christmas ornament door hanger project from the Dollar store.
Since my front door is navy blue, I chose mainly blue ornaments but added some red and white ribbon for an extra dose of Christmas color.

To make this Christmas ornament door hanger, you will need the following supplies:
- Four pieces of wood sized 19″ x 1″ x 3/4″ thick
- 4 screws
- Drill
- Wire cutters
- Staple gun
- 2 1/2 feet of light weight chicken wire
- White spray paint
- Hot glue gun and hot glue sticks
- 20 small lightweight Christmas ornaments
- 4 mini snowman ornaments
- Wire edged ribbon
- 12″ of 1/4″ white ribbon to tie the bow
- Silver ornament hangers
To start the door hanger project we cut four pieces of wood to the size we needed for our door (19″ x 1″ x 3/4″ thick) We made an angled cut on one end but left one end square.
The photo shows only two angles, but you will need four. Four make the top and bottom joint and the other opposite ends will be measured and cut later for the center joint.
Next I hot glued the two angled ends of the wood together with a hot glue gun to hold them in place. 
When the glue set, Richard drilled the joint and attached screws to hold it in place and then trimmed the chicken wire with wire cutters.
The next part was the hardest for us to figure out. I kept saying “why didn’t I pay more attention in geometry class?”
Finally, we figured out that laying each of the angles on top of each other and using a straight edge gave us the center cut that we needed. This was also glued and then screwed together.

The next step was to square off the bottom and top of the Christmas Ornament Door Hanger.
The rest of the project was easy. We placed the chicken wire on the back, and used a staple gun to fasten it in place.
A quick spray of white paint on both the wood and chicken wire and it was ready for me to hang my ornaments.
I used 20 small lightweight ornaments and four flat backed small blue and white snowmen mini ornaments on it.
The last step was to use 2 1/2″ wire edged ribbon to make a big puffy bow.
I just wound it around and around, tied it in the middle and then used the thin ribbon to loop through the chicken wire on the back to hold it in place and then puffed it into a big round bow shape.
Be sure to check out my tutorial for making a floral bow here
 Time to display the Christmas ornament door hanger
TaDa! It fits perfectly in the glass portion of my front door. I love the way it fills the whole glass panel. I have a hard time getting wreaths to look right and this was a great change.
It’s beginning to look a lot like Christmas at the Speake’s!
I also added a cute snowman made from more reclaimed wood on the side shutter. An Elves on Duty floor display completes the look.
See how to make the Snowman shutter project here, and the Elves on Duty sign here.
If you want to make this Christmas ornament door hanger even more spectacular, try adding some battery powered Christmas lights, to really make the project sparkle!

Thanks to Welke for the inspiration for this project.
Would you like a reminder of this Christmas ornament door hanger project? Just pin this image to one of your Christmas boards on Pinterest.
Admin note: This project for my Christmas ornament door hanger first appeared on the blog in December of 2016. I have updated the post to add a printable project card and a video for you to enjoy.
Christmas Ornament Door Hanger
This diamond shaped door hanger will fit on an oval glass paned front door and welcome visitors in style. Coordinate your ornaments to match your door color.
Materials
- Four Pieces of wood sized 19" x 1" x 3/4" thick
- 2 1/2 feet of light weight chicken wire
- white spray paint
- hot glue Gun and hot glue sticks
- 20 small lightweight Christmas ornaments
- 4 mini snowman ornaments
- Wire Edged Ribbon
- 12" of 1/4" white ribbon to tie the bow
- 20 silver ornament hangers
Tools
- 4 Screws
- Drill
- Wire cutters
- Staple Gun
- Saw
Instructions
- Cut four pieces of wood (19" x 1" x 3/4" thick)
- Make an angled cut on one end but leave one end square. Repeat for the other two pieces of wood.
- Hot glue the two angled ends together with a hot glue gun to hold them in place. Attach with a screw to extra stability.
- Lay the wood piece over the chicken wire and cut roughly to shape with wire cutters.
- Use a saw to square off the top and bottom of the piece of wood.
- Attach the chicken wire to the back of the wood frame with a staple gun. Trim any excess wire.
- Spray the wooden frame and the chicken wire with white paint.
- Use the silver ornament holders to attach the ornaments and snowmen to the chicken wire section.
- Use the 2 1/2" wire edged ribbon to make a big puffy bow. Just wind it around your hand, tie it in the middle and then use the thin ribbon to loop through the chicken wire on the back to hold it in place;
- Puff the loops of the bow into a big round bow shape and attach it to the top of the door hanger.
Martin Williams
Friday 30th of December 2016
Thanks for sharing beautiful DIY project for Christmas. Your oval shaped panel door looks elegant with blue color paint. Ribbon with blue color ornaments are perfect match with your shiny front door. Overall looks very nice.
Carol
Saturday 31st of December 2016
Thanks Martin. Glad you like it !